The 'Location Tree' module enables the creation of a detailed, nested hierarchical list of all regions, areas, and spots within the construction project. This allows you to break down the structure into granular, manageable segments, forming an organized tree structure. Team members can then reference these precise locations in various project documents such as RFIs, Submittals, Change Orders, and Punch List items. This ensures clarity and accuracy, as each item can be directly linked to the specific spot within the structure to which it pertains.
- Block 1
- Floor 1
- Apartment 105
- Kitchen
- Master Bedroom
- Apartment 110
- Living Room
- Storeroom
- Apartment 105
- Floor 1
- The project manager or the authorized person can create and upload the list of locations to the project.
- Optionally, each entry can be marked on the relevant plan sheet and attached for quick reference.
- Once done these entries are available for selection in the location field while creating RFI, Submittal, etc.
- You can update the locations for a project at anytime to add new entries
Linarc also supports the generating of a QR code for each location. These codes can be printed as physical sheets and stuck to the respective locations on the site. Users can scan these QR codes to auto-fill in the location field when creating an RFI, Punchlist item, etc, reducing the manual work of specifying the location and making the entry error-free.
View the location tree structure of the project site
- Ensure you are on the 'Location' screen within the 'Project Information' module of the project. If not:
- Click the main menu at the top-left
- Click 'Information' under 'Project' in the menu drop-down.
- Select 'Location Tree' on the left.
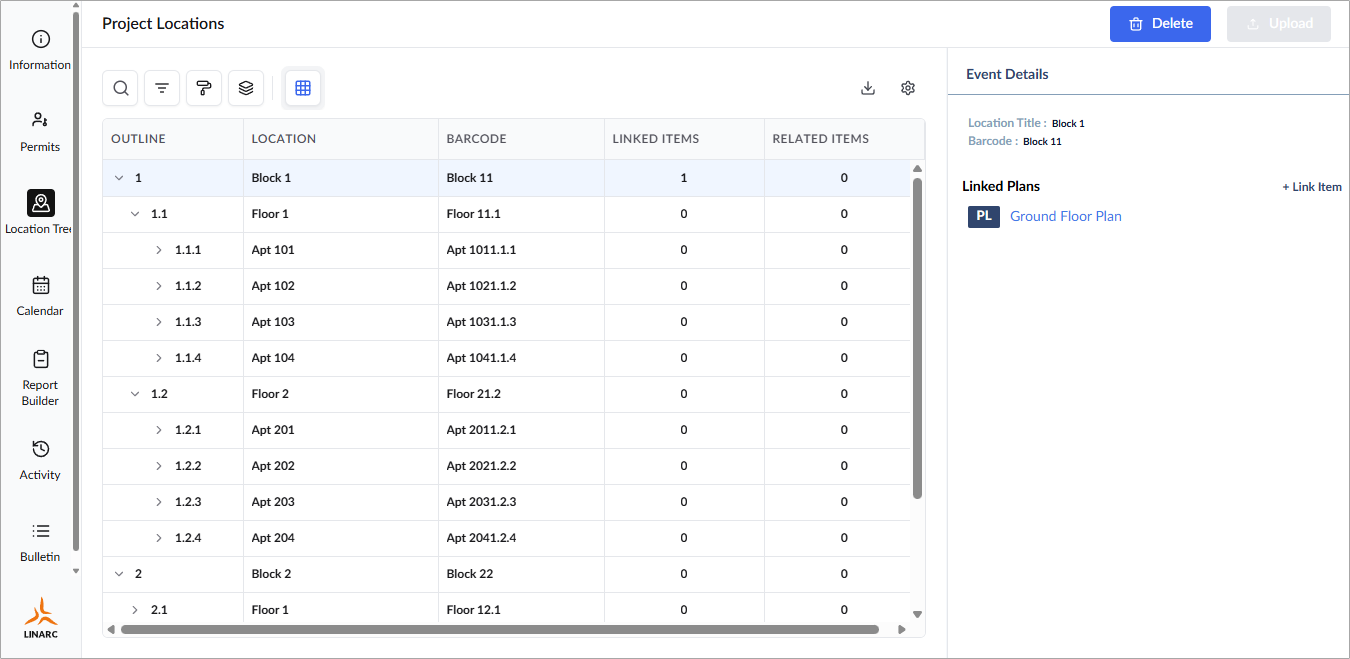
The table shows the nested list of locations defined for the project.
- Expand a level by clicking the right arrow beside a parent-level item.
Column descriptions
- Outline - The serial number of the location in outline numbering system
- Location - The label of the location
- Barcode - A unique identifier for the location. This is used to create the QR code for the location
- Linked Items - The number of plan sheets/ plan markups that are directly associated with the location.
- Related Items - The number of associated project records connected to the location, including RFIs, submittals, change orders, and T&M tickets.
The details pane on the right shows the information about the selected location item. If the location has a plan markup attachment, it is also shown.
- Click the link to open the plan sheet with the location marked up
Add plan markups to identify the locations
You can point the spot identified by the location on the relevant plan sheet and attach it to the location for reference. This makes the location entries error free and easy to identify, when used in project documents and items. You can link plan drawings with or without markups, or already existing markups to the location.
- Select a location entry to view its details on the right pane
- Click 'Link Item' beside 'Linked Plans'
To select a plan and create a new markup
- Choose 'Plans' in the link items drop-down menu
- The plan drawings added for the project are shown:
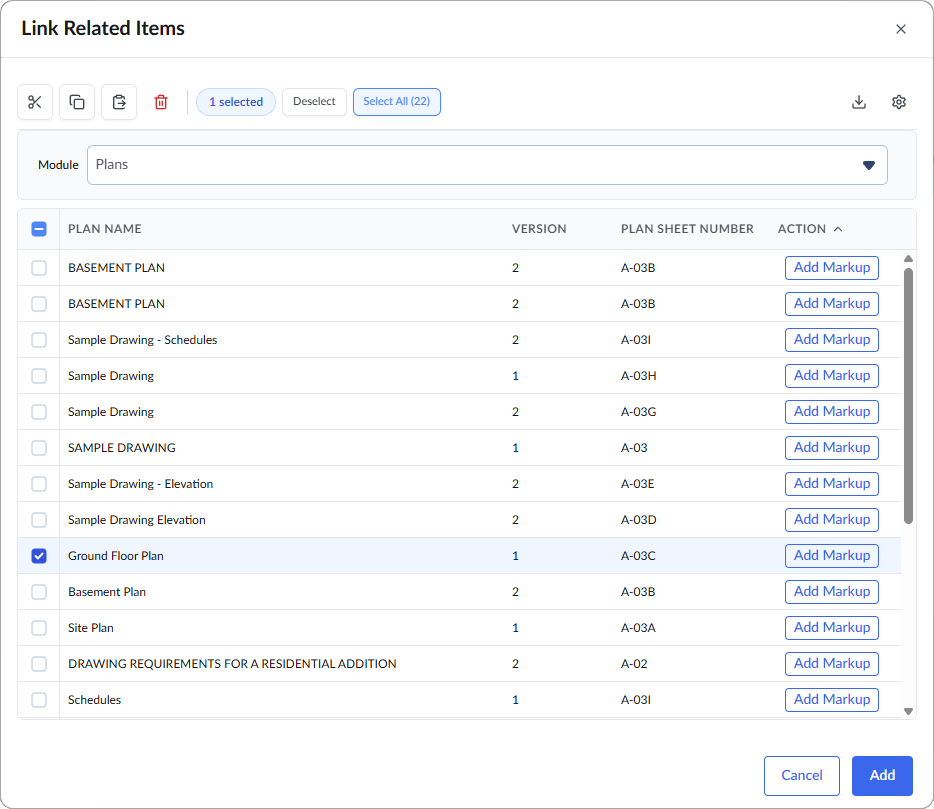
- To add a plan sheet, select the plan you want to use by clicking the check box on its left and click the 'Add' button
- To create a new markup to specify the location click 'Add markup' on the left. See Markups for guidance on creating different types of markups on the plan drawing.
- Enter a name for the markup and save it.
- Repeat the process to add more plan drawings.
Plan markups
- Select a location entry to view its details on the right pane
- Click 'Link Item' beside 'Linked Plans'
- Choose 'Plan Markups' in the link items drop-down menu
The list of plan markups added to various plan drawings for the project is shown
- Select the markup and click the 'Add button'
- Repeat the process to attach plans/markups for more locations.
You can update the locations list of the project to add new locations at any time, following the same procedure.
Search, Filter, and Sorting Options
- Click the magnifier icon and use the 'Search' box located at the top left to find an entry using any value from the table as search criteria
- Click any column header to sort the rows in ascending or descending order based on that column's data.
- Click the cog wheel icon at the top right to adjust the display density and customize the display and order of the columns. See Customize Columns in List Views.
- The options at the top left allow you to filter the entries, create nested groups of entries, highlight cells and manage personalized and customized views of the table. Use the links below to learn more:
Use the following links to jump to the section you need help with:
Was this article helpful?
That’s Great!
Thank you for your feedback
Sorry! We couldn't be helpful
Thank you for your feedback
Feedback sent
We appreciate your effort and will try to fix the article